Understanding the WebSocket Protocol with ASP.NET Core
Updated · originally #dotnet#aspnetcore#networking9 min read
The WebSocket protocol lets a client and server exchange full-duplex messages over a persistent connection. This guide uses ASP.NET Core to explain the RFC 6455 HTTP upgrade handshake, message frames, and closing handshake before building a raw echo endpoint with UseWebSockets and System.Net.WebSockets.
This guide uses raw WebSockets rather than SignalR so the protocol and ASP.NET Core APIs stay visible. For most application-level real-time features, SignalR is still the higher-level option because it adds an RPC model and transport fallback.
💡 This tutorial targets .NET 7. The .NET 5 version of the sample is still on the
dotnet-5branch.
Walkthrough video
If you like to watch a video walkthrough instead of this article, you can follow along on my Youtube channel too 😊
How the WebSocket handshake works
WebSockets was introduced to enable two-way communication between a client and a server. One of the pain points with HTTP 1.0 was creating and closing a connection each time we send a request to the server. With HTTP 1.1 however, persistent connections (RFC 2616) were introduced by making using of a keep-alive mechanism. With this, connections could be reused for more than one request - which will reduce latency as the server knows about the client and they do not need to start over the handshake process per request.
💡 When you are learning about protocols, a good place to start is to read its corresponding RFC specification.
The original WebSocket handshake uses an HTTP/1.1 request to upgrade a TCP connection from HTTP to the WebSocket protocol. .NET 7 also added WebSockets over HTTP/2 in Kestrel, which uses an extended CONNECT request instead of GET. This guide follows the HTTP/1.1 upgrade because it makes the RFC 6455 handshake easy to inspect.
The following diagram shows the opening handshake, data transfer, and closing handshake. We will look at each stage below.
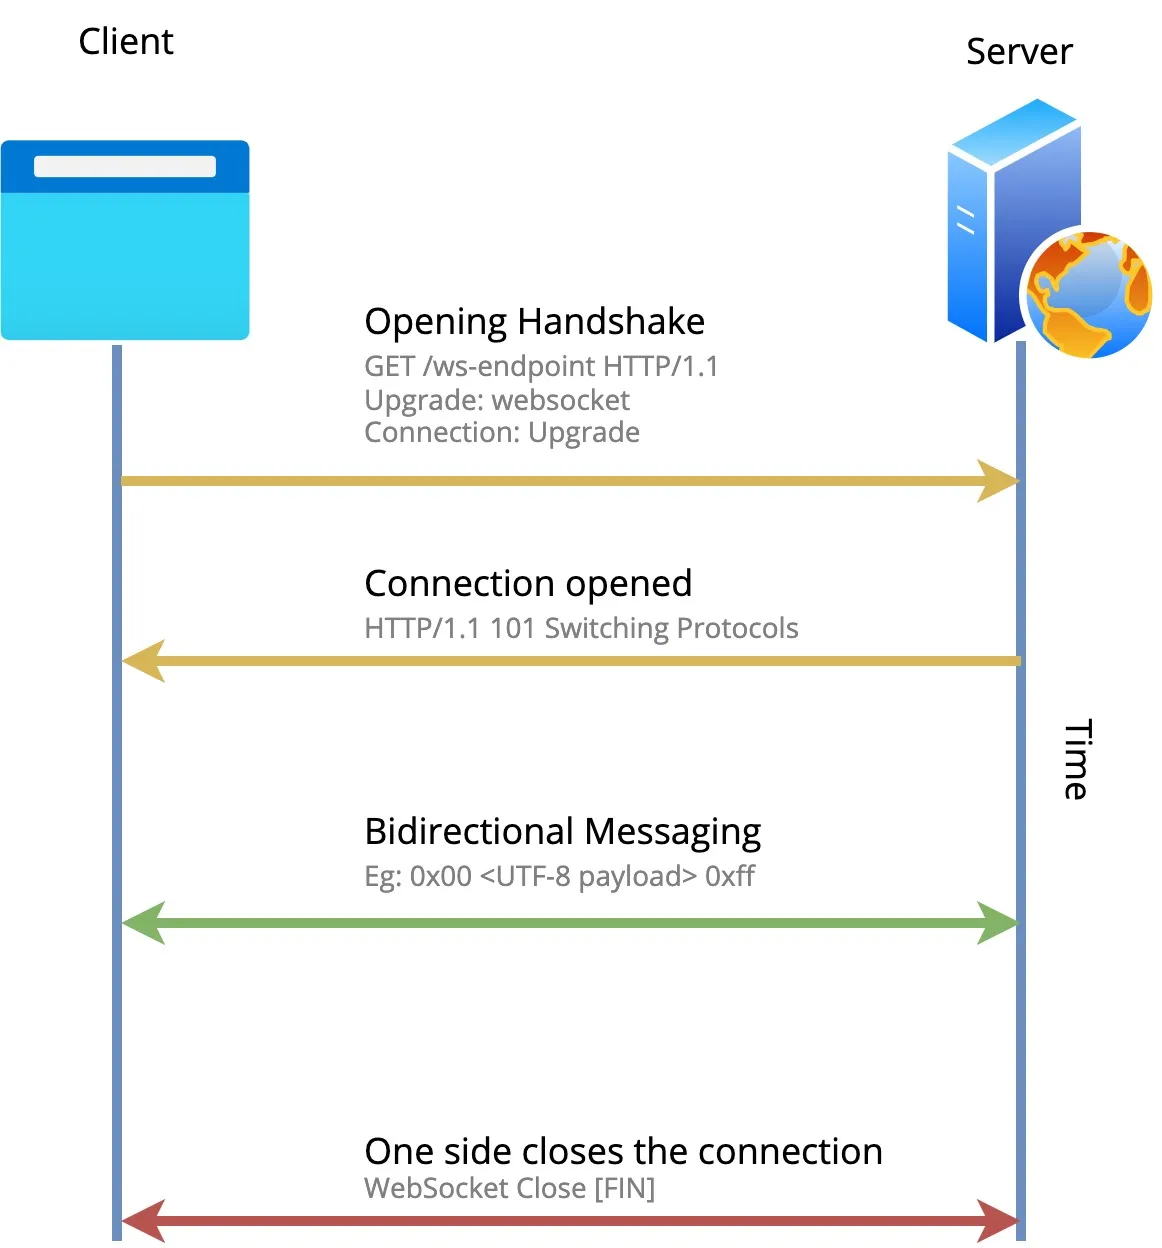
The protocol has two parts to it; Handshake and Data Transfer.
Handshake
Let’s talk about the opening handshake first. From the spec,
The opening handshake is intended to be compatible with HTTP-based server-side software and intermediaries, so that a single port can be used by both HTTP clients talking to that server and WebSocket clients talking to that server.
Simply put, a WebSocket connection is based on HTTP (and TCP as transport) over a single port. Here’s the summary of steps.
- A server must be listening for incoming TCP socket connections. This could be any port you have assigned - normally this would be
80or443. - The client initiates the opening handshake (otherwise the server wouldn’t know who to talk to) with an HTTP GET request - This is the “Web” part in “WebSockets”. In the headers, the client will ask the server to Upgrade the connection to a WebSocket.
- The server sends a handshake response telling the client that it will be changing the protocol from HTTP to WebSocket.
- Both client and server negotiate the connection details. Either of the parties can back out if the terms are unfavourable.
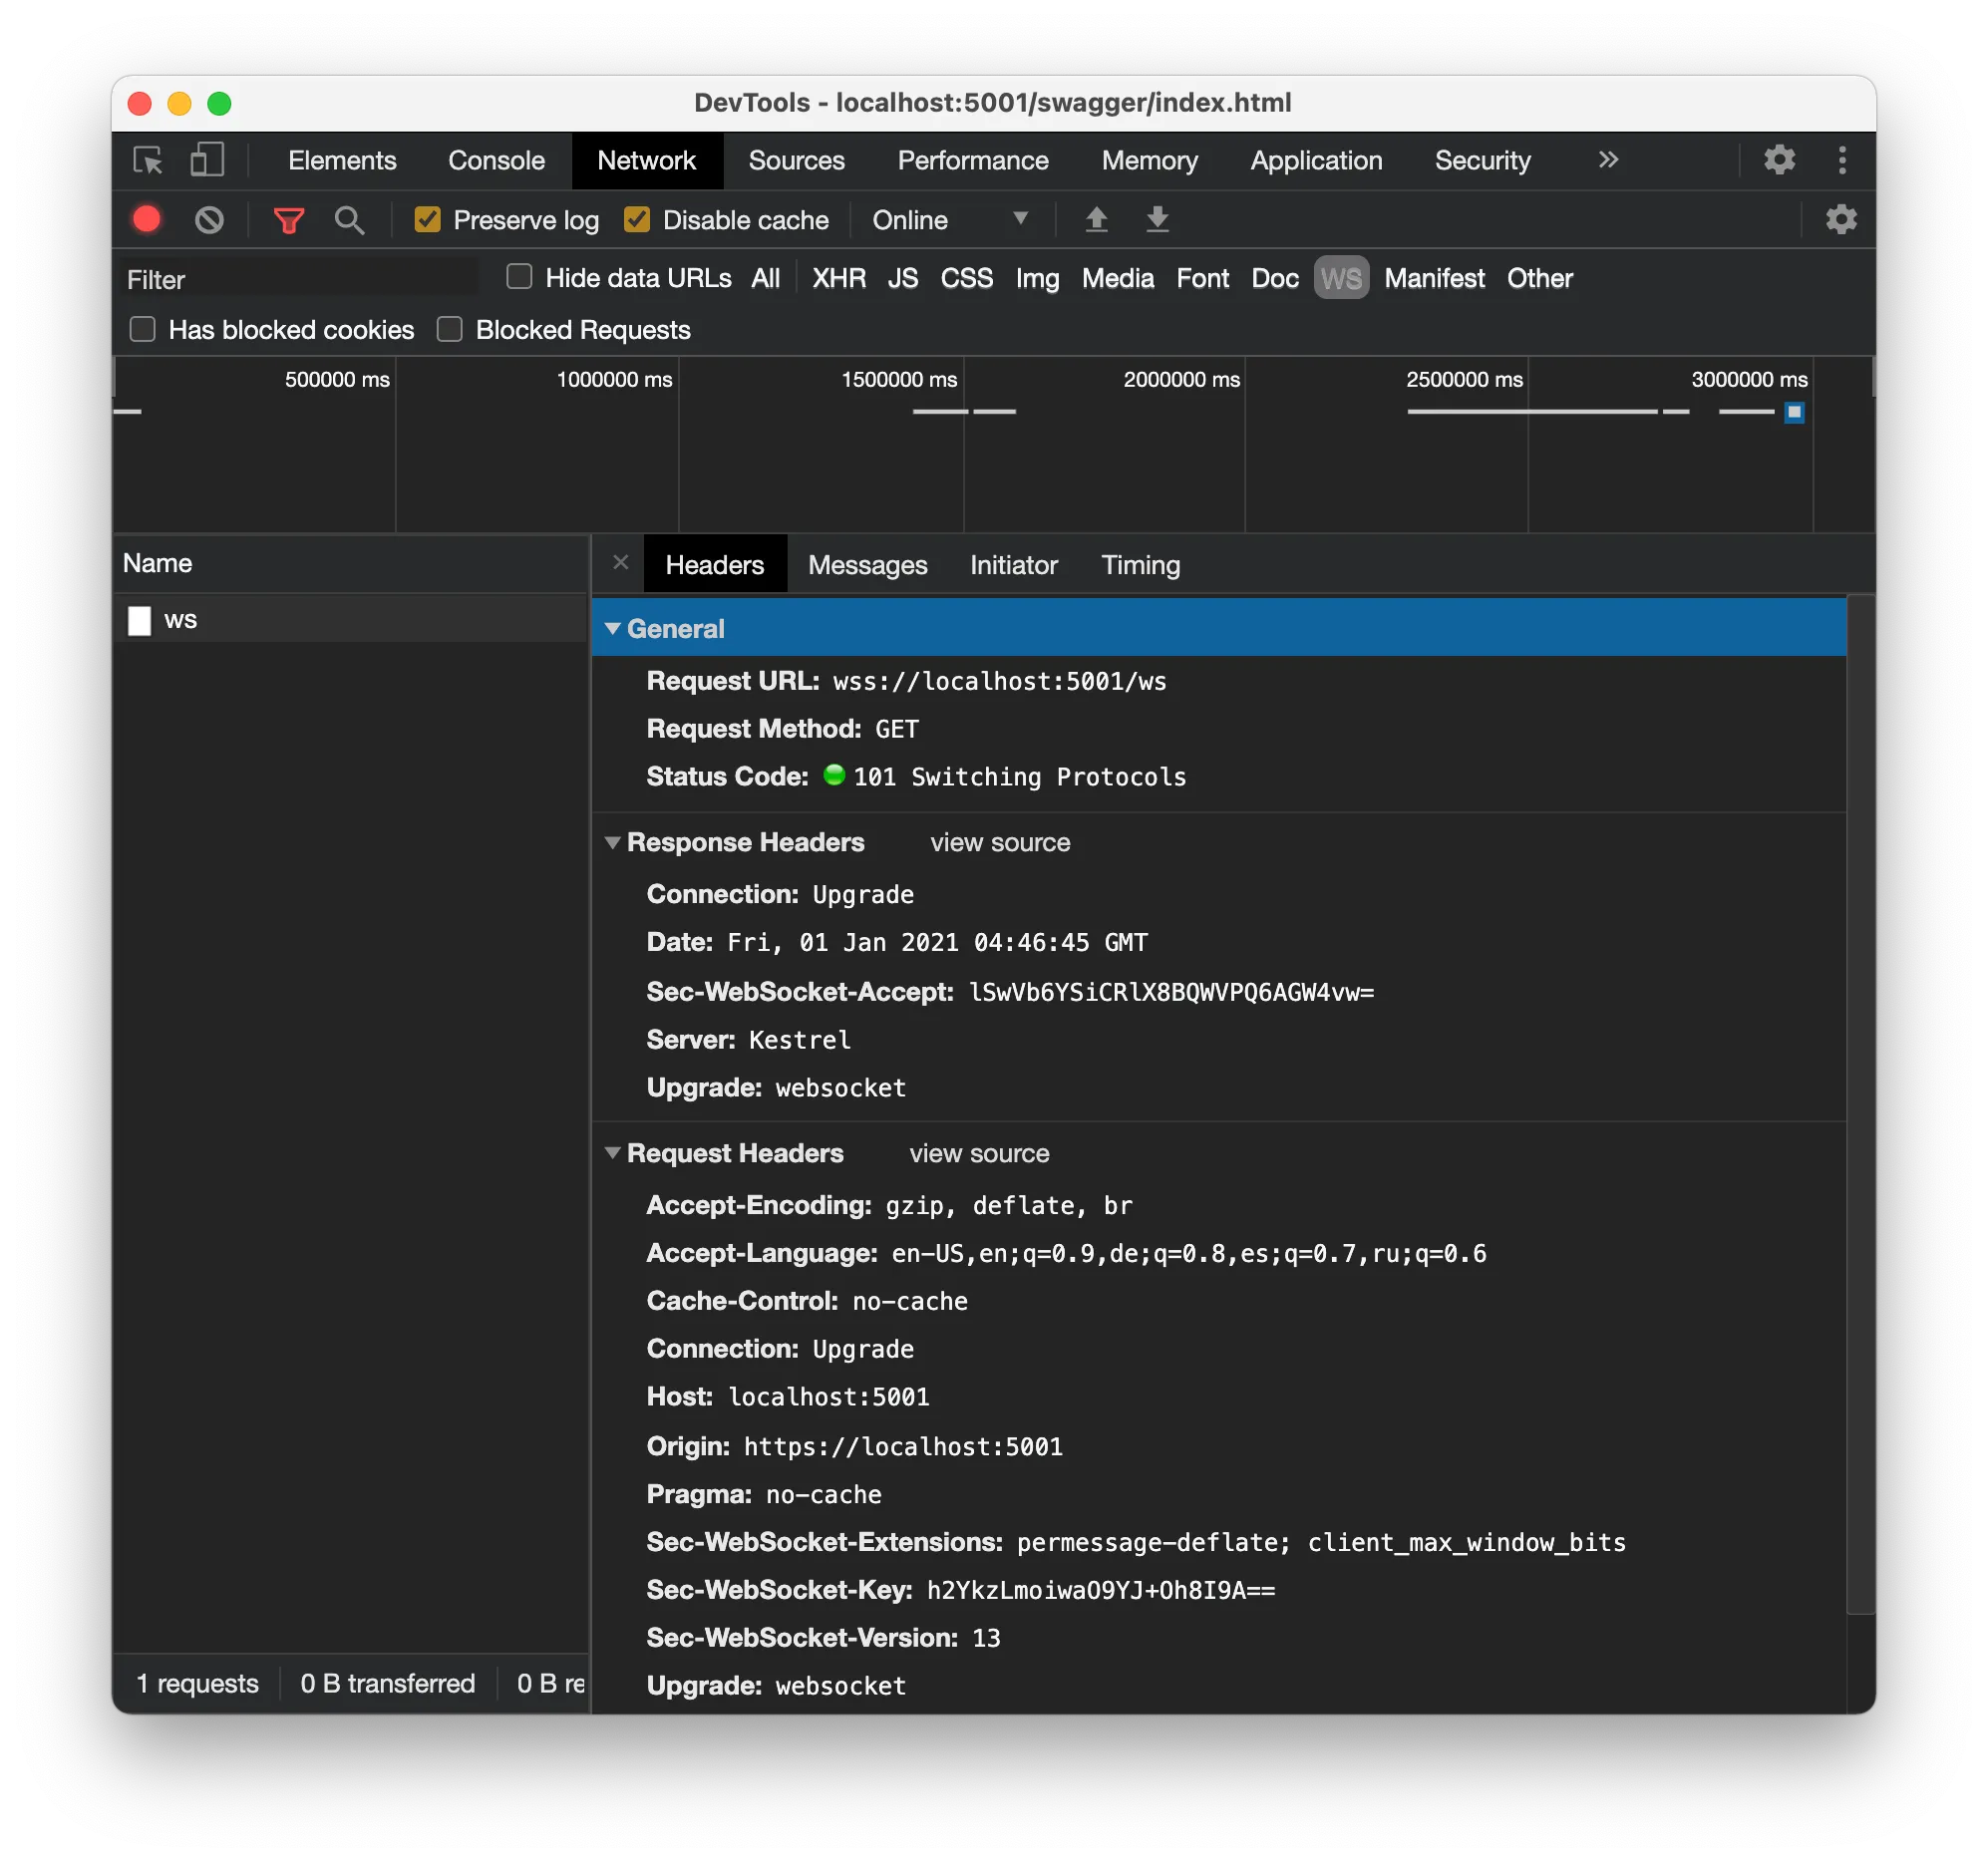
Here’s what a typical opening (client) handshake request looks like.
GET /ws-endpoint HTTP/1.1
Host: example.com:80
Upgrade: websocket
Connection: Upgrade
Sec-WebSocket-Key: L4kHN+1Bx7zKbxsDbqgzHw==
Sec-WebSocket-Version: 13
Note how the client sends out Connection: Upgrade and Upgrade: websocket headers in the request.
And, the server handshake response,
HTTP/1.1 101 Switching Protocols
Upgrade: websocket
Connection: Upgrade
Sec-WebSocket-Accept: CTPN8jCb3BUjBjBtdjwSQCytuBo=
Note how the server sends out HTTP/1.1 101 Switching Protocols in the response headers. Anything other than a 101 indicates that the opening handshake was not completed.
The closing handshake is pretty simple. Either the client or server can send out a closing handshake request. From the spec,
It is safe for both peers to initiate this handshake simultaneously. The closing handshake is intended to complement the TCP closing handshake (FIN/ACK), on the basis that the TCP closing handshake is not always reliable end-to-end, especially in the presence of intercepting proxies and other intermediaries.
We will talk about these in action when we jump over to the demo section.
Data Transfer
The next key concept we need to understand is Data Transfer. Either of the parties can send messages at any given time - as it is a Full Duplex communication protocol.
The messages are composed of one or more frames. A frame can be of type text (UTF-8), binary, and control frames (such as 0x8 (Close), 0x9 (Ping), and 0xA (Pong)).
If you are interested, you can read the full RFC spec from here.
Build an ASP.NET Core WebSocket echo server
Let’s put this into action and see how it works.
💡 Follow along with the completed code from my repository here
First create a .NET 7 ASP.NET Core Web API app.
dotnet new webapi -n WebSocketsTutorial
dotnet new sln
dotnet sln add WebSocketsTutorial
The raw WebSocket APIs are part of ASP.NET Core, so this example does not need a SignalR package.
Accept and echo WebSocket messages
We will start by adding the WebSockets middleware to our WebAPI app. Head over to the Startup.cs file and add the following line inside the Configure method.
This tutorial stays at the WebSocket layer. SignalR hubs solve a different, higher-level problem and would hide the handshake and message loop that we want to inspect.
...

app.UseWebSockets();

...
Next, we will delete the default WeatherForecastController and add a new controller called WebSocketsController. Note that we will be just using a controller action instead of intercepting the request pipeline
The full code for this controller looks like this. It follows Microsoft’s ASP.NET Core WebSockets example.
using System;
using System.Net.WebSockets;
using System.Text;
using System.Threading;
using System.Threading.Tasks;
using Microsoft.AspNetCore.Mvc;
using Microsoft.Extensions.Logging;

namespace WebSocketsTutorial.Controllers
{
    [ApiController]
    [Route("[controller]")]
    public class WebSocketsController : ControllerBase
    {
        private readonly ILogger<WebSocketsController> _logger;

        public WebSocketsController(ILogger<WebSocketsController> logger)
        {
            _logger = logger;
        }

        [Route("/ws")]
        public async Task Get()
        {
          if (HttpContext.WebSockets.IsWebSocketRequest)
          {
              using var webSocket = await HttpContext.WebSockets.AcceptWebSocketAsync();
              _logger.Log(LogLevel.Information, "WebSocket connection established");
              await Echo(webSocket);
          }
          else
          {
              HttpContext.Response.StatusCode = 400;
          }
        }

        private async Task Echo(WebSocket webSocket)
        {
            var buffer = new byte[1024 * 4];
            var result = await webSocket.ReceiveAsync(new ArraySegment<byte>(buffer), CancellationToken.None);
            _logger.Log(LogLevel.Information, "Message received from Client");

            while (!result.CloseStatus.HasValue)
            {
                var serverMsg = Encoding.UTF8.GetBytes($"Server: Hello. You said: {Encoding.UTF8.GetString(buffer, 0, result.Count)}");
                await webSocket.SendAsync(new ArraySegment<byte>(serverMsg, 0, serverMsg.Length), result.MessageType, result.EndOfMessage, CancellationToken.None);
                _logger.Log(LogLevel.Information, "Message sent to Client");

                buffer = new byte[1024 * 4];
                result = await webSocket.ReceiveAsync(new ArraySegment<byte>(buffer), CancellationToken.None);
                _logger.Log(LogLevel.Information, "Message received from Client");

            }
            await webSocket.CloseAsync(result.CloseStatus.Value, result.CloseStatusDescription, CancellationToken.None);
            _logger.Log(LogLevel.Information, "WebSocket connection closed");
        }
    }
}
Here’s what we did,
- Add a new route called
ws/ - Check if the current request is via WebSockets otherwise throw a 400.
- Wait until client initiates a request. L:40
- Going into a loop until the client closes the connection. L:43
- Within the loop, we will prepend “Server: Hello. You said: <client’s message>” to the message and send it back to the client.
- Wait until the client send another request.
ReceiveAsync can return one fragment rather than a complete logical message. result.Count tells us how many bytes were written to the buffer, and result.EndOfMessage tells us whether that fragment completes the message. This small demo echoes each received fragment with the same EndOfMessage value. A production handler that needs complete messages should accumulate fragments until EndOfMessage is true.
Note that the server does not need to wait until the client sends a request to push messages to the client, after the initial handshake. Let’s run the application and see whether it works.
dotnet run --project WebSocketsTutorialOnce you run the application, head over to https://localhost:5001/swagger/index.html. You should see the Swagger UI.
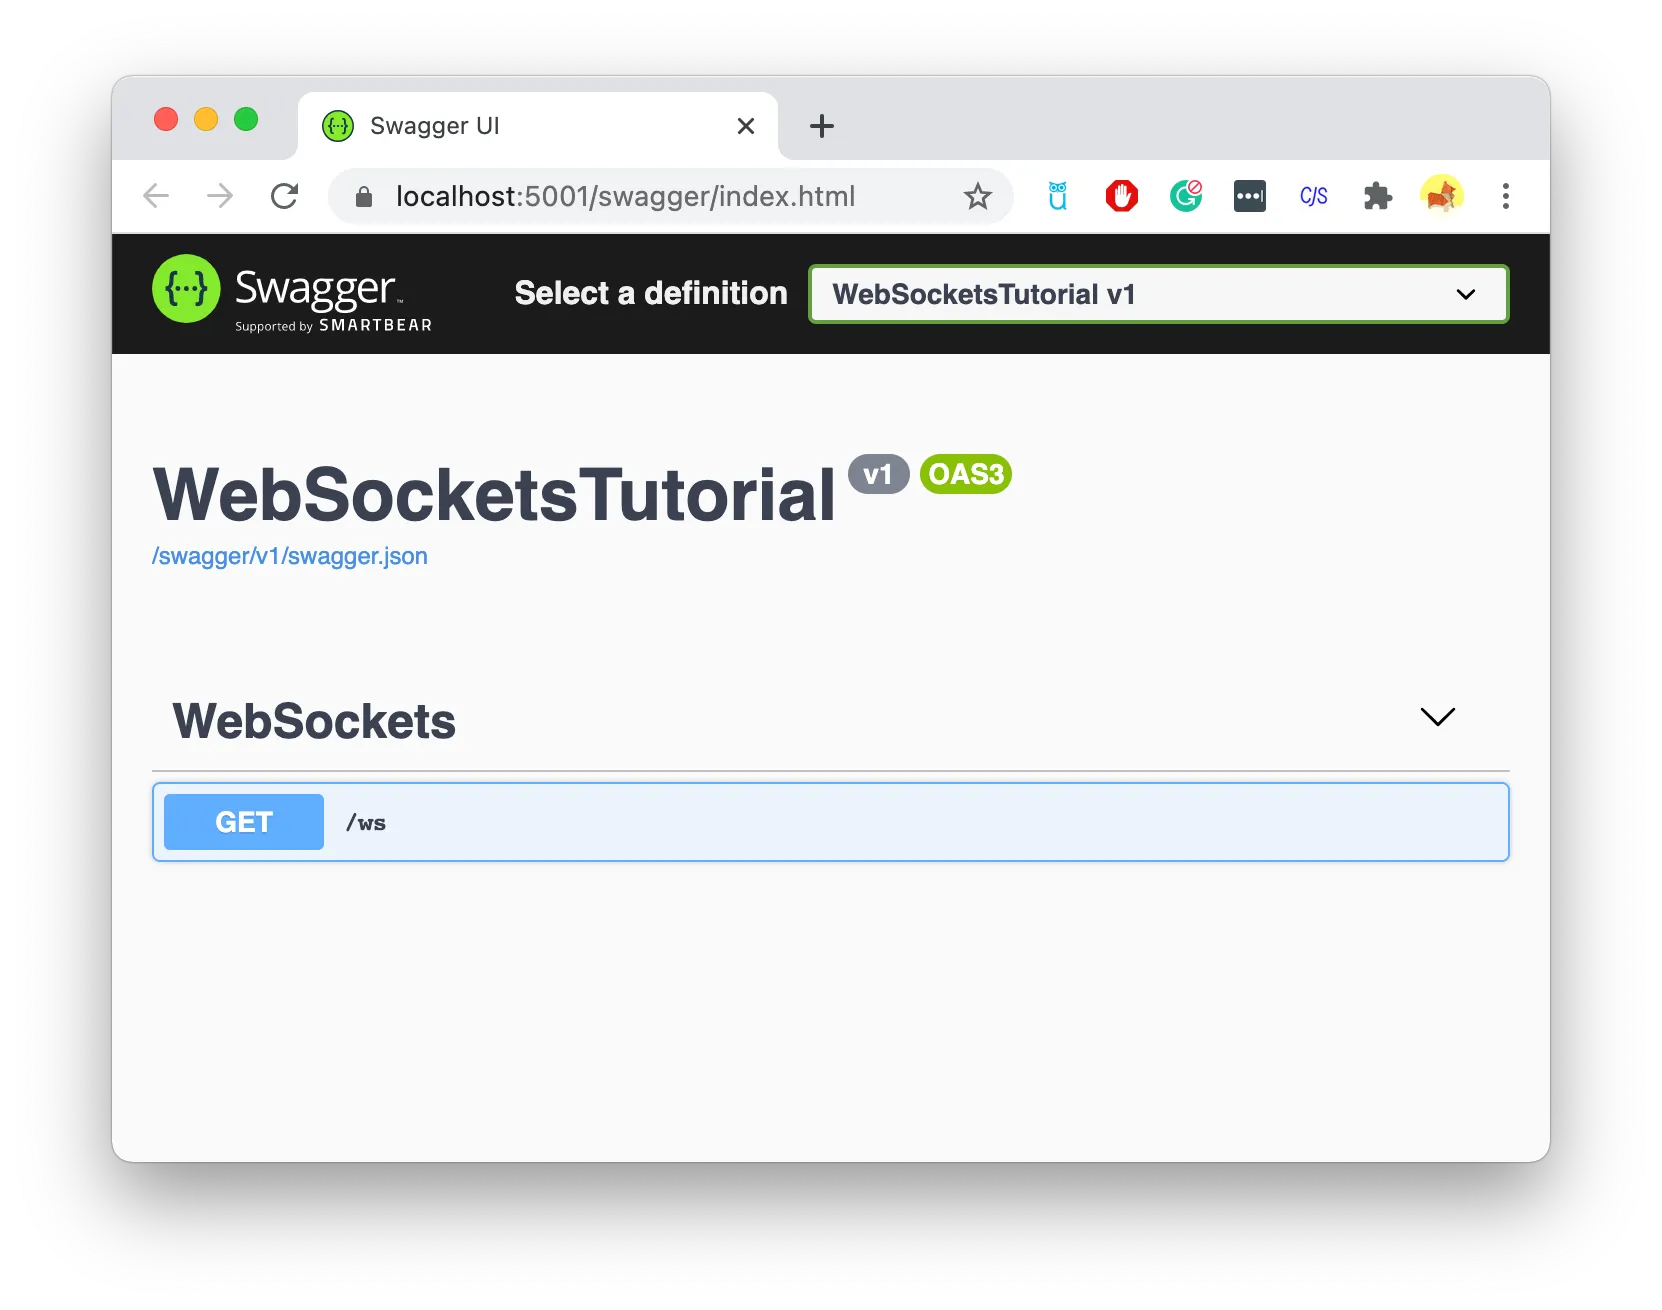
We will now see how we can get the client and server to talk to each other. For the purpose of this demo, I will be using Chrome’s DevTools (Open new tab → Inspect or press F12 → Console tab). But, you can use any client of your choice.
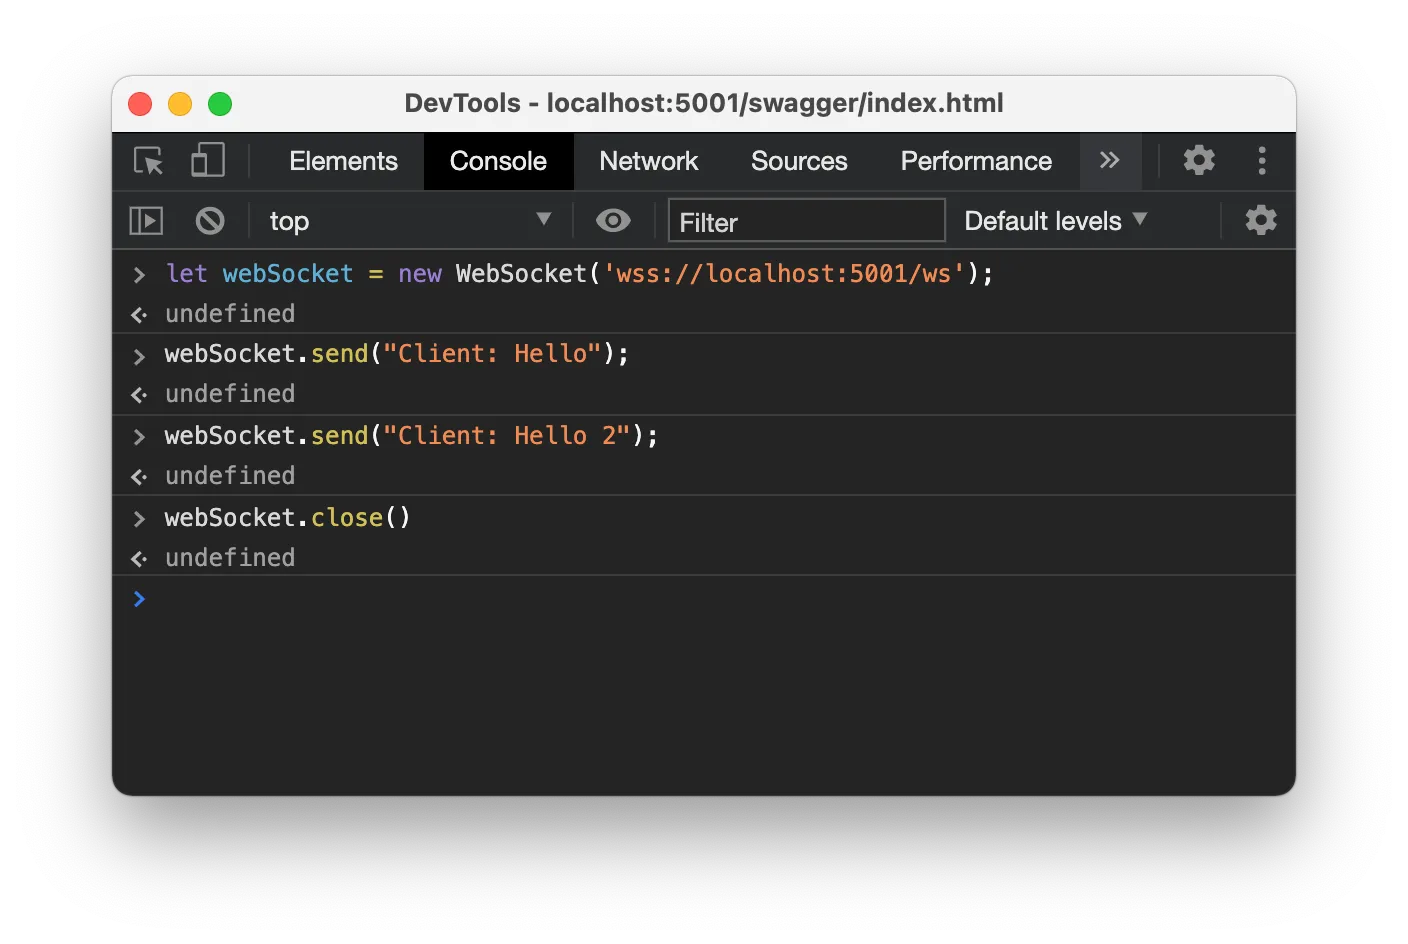
First, we will create a WebSocket connection to our server endpoint.
let webSocket = new WebSocket('wss://localhost:5001/ws');What this does is, it initiates a connection between the client and the server. wss:// is the WebSockets Secure protocol since our WebAPI app is served via TLS.
You can then send messages by calling webSocket.send() method. Your console should look similar to the one below.
Inspect WebSocket frames in Chrome DevTools
if you go to the Network tab, filter out the requests by the WS tab and click on the last request called ws.
Click on the Messages tab and examine the message passed back and forth. During this time, if you invoke the following command, you will be able to see “This was sent from the Client!” appearing in this box. Give it a try!
webSocket.send("Client: Hello");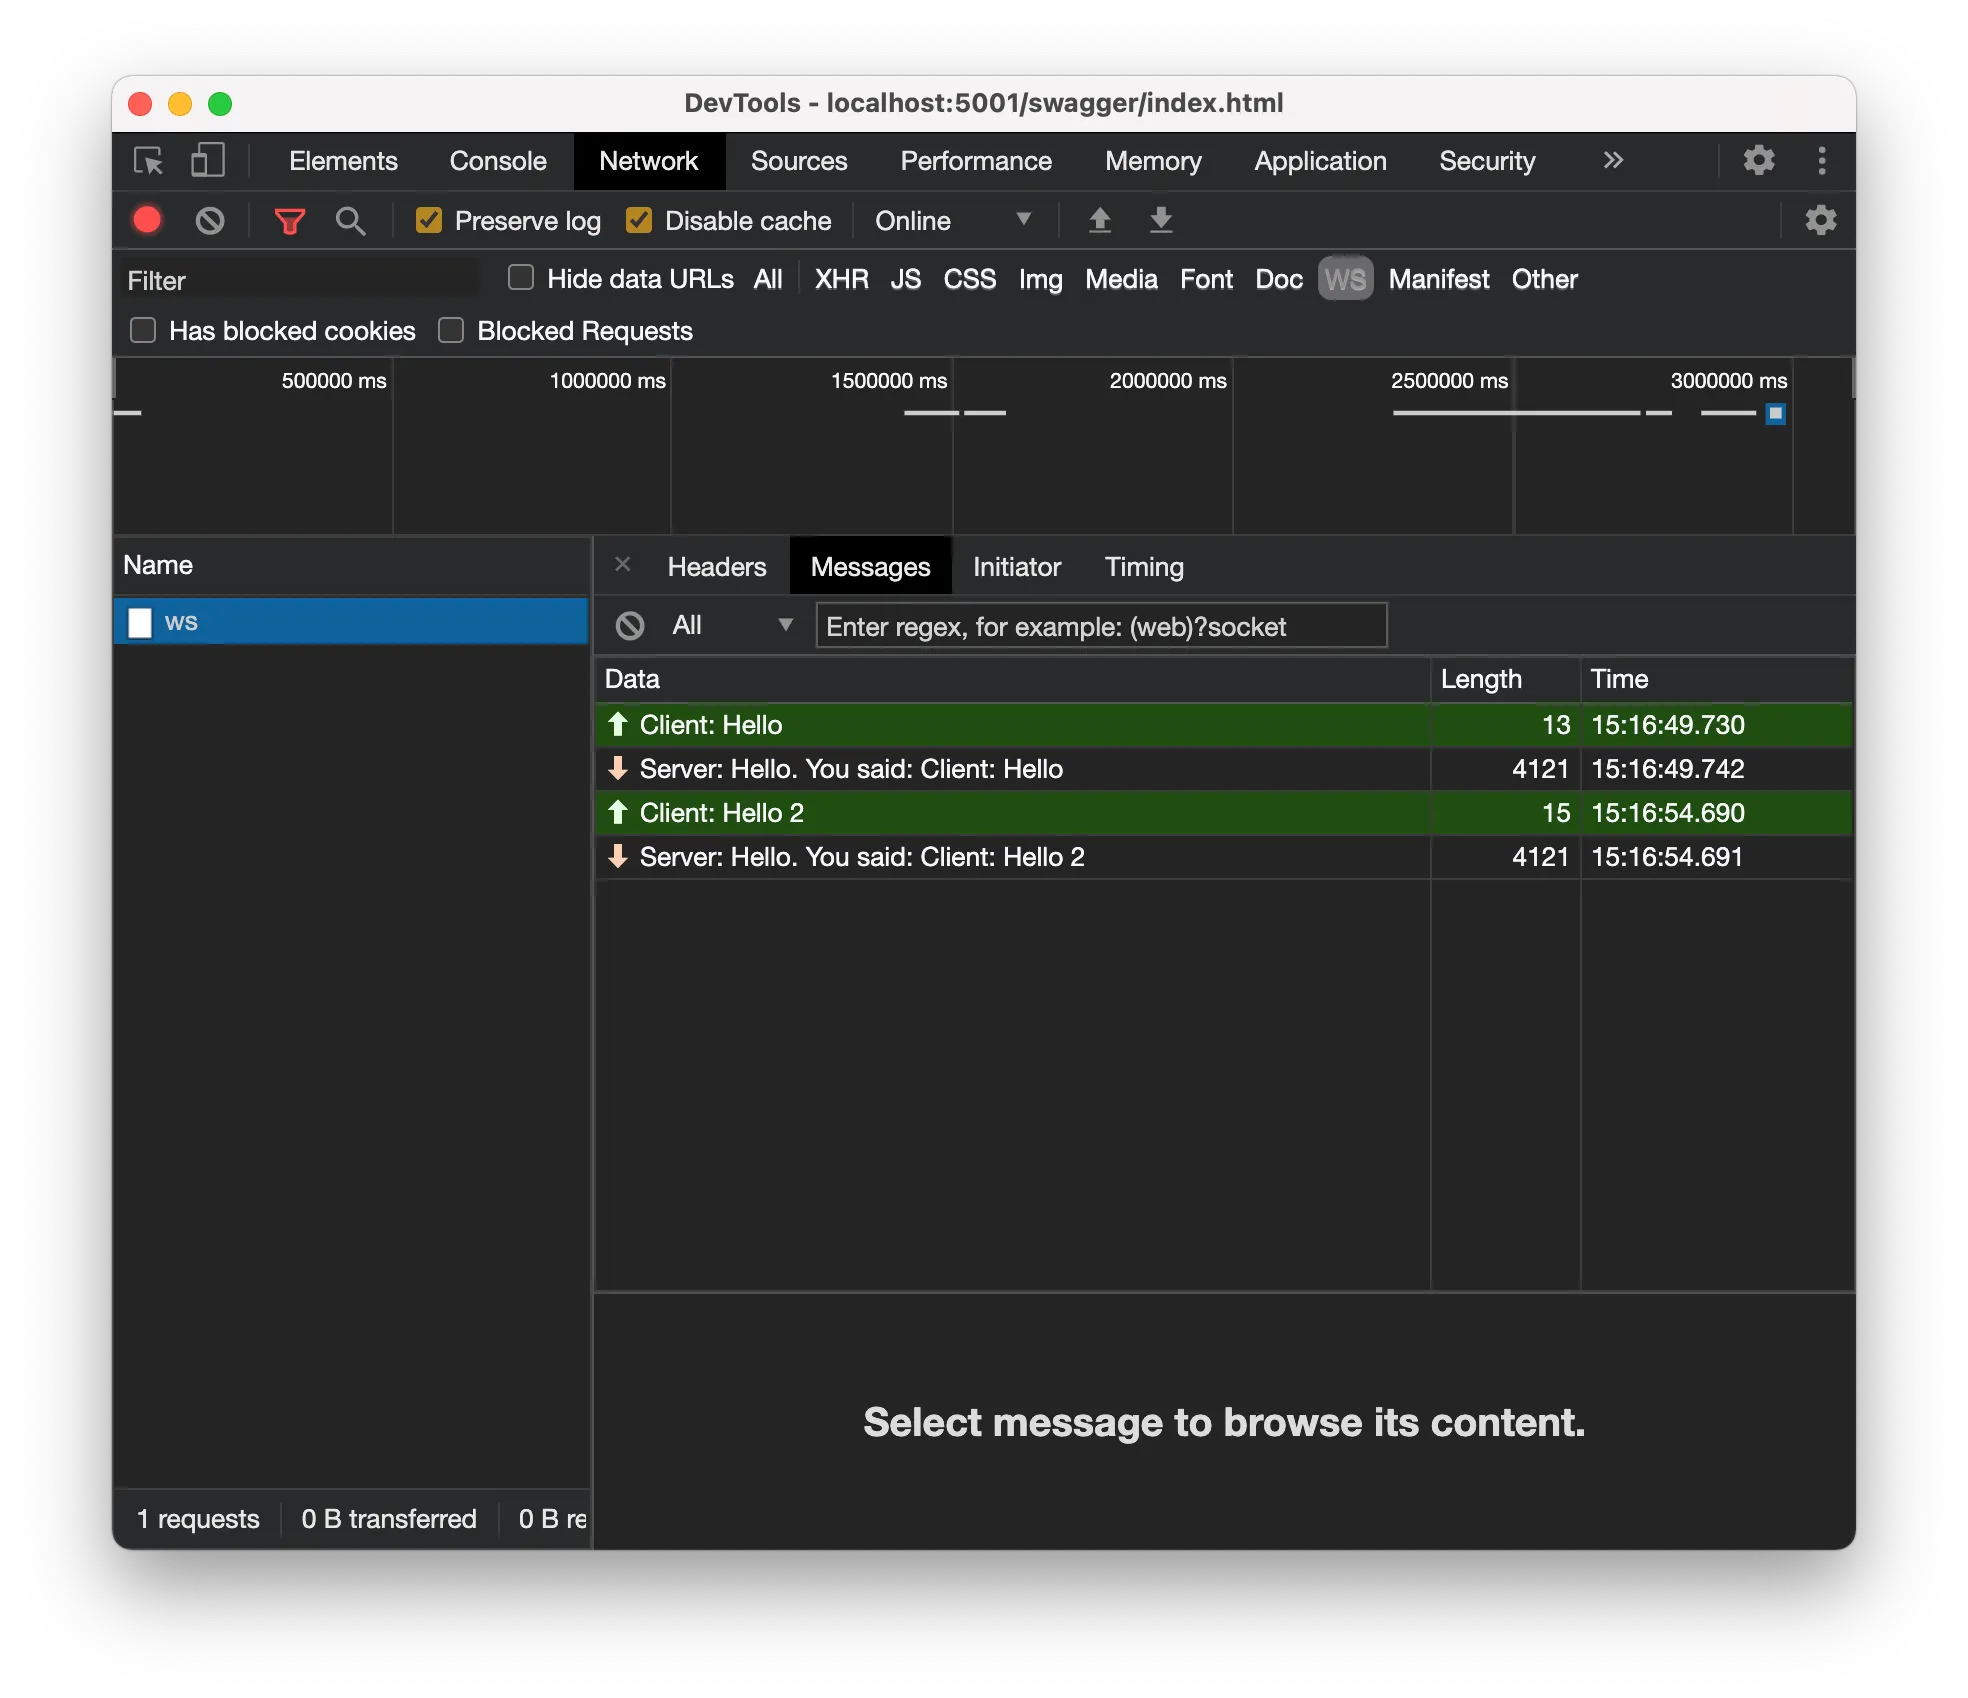
As you can see, the server does need to wait for the client to send a response (that is, after the initial handshake), and the client can send the messages without being blocked. This is Full Duplex communication. We have covered the Data Transfer aspect of WebSocket communication. As an exercise you could run a loop to push messages to the client to see it in action.
In addition to this, the server and client will have ping-pongs to see if the client is still alive. This is an actual feature in WebSockets! If you really want to have a look at these packets, you can use a tool like WireShark to get an idea.
How does it do the Handshake? Well, if you jump over to the Headers tab, you will be able to see the request-response headers we talked about in the first section of this post 🙌
Have a play around with webSocket.close() too so that we can fully cover the open-data-close loop.
What to take away
If you are interested in having a look at the RFC for WebSockets, head over to RFC 6455 and have a read. This post only scratches the surface of WebSockets, and there are many other things that we could discuss such as Security, Load Balancing, Proxies etc.
WebSockets are not the only way to hold a connection open for two-way traffic. Introduction to gRPC covers the streaming modes you get over HTTP/2 instead, and why you might reach for those between services rather than a raw socket.
Don’t forget to let me know any feedback or comments. Until next time ✌️