Upgrading sahansera.dev to Gatsby 5
How I Upgraded My Blog to Gatsby V5
The time is now 1:45 AM and I’m finally done upgrading my blog to Gatsby V5. It’s been one heck of a ride, but it was worth it.
This blog post is a reflection of my experience upgrading my blog to Gatsby V5. I’ll cover the challenges I faced, the solutions I found, and the lessons learned along the way.
The Upgrade Journey
After a two year long hiatus from blogging, I decided to dust off my old blog and give it a much-needed facelift. When I tried to run gatsby develop, I was greeted with a slew of warnings and errors. It was clear that my blog was long overdue for an upgrade.
I took a crack at it a few months ago, but I quickly got overwhelmed by the number of breaking changes and decided to put it on hold. This time it’s different because I was determined to fully utilize LLMs for my advantage.

Being a weekend, which is filled with family time and chores, I decided to timebox it just for a few hours. I thought, “How hard can it be? Just a few package updates and some code tweaks, right?” Little did I know that this would turn into a full-blown adventure.
Dependency Overhauls
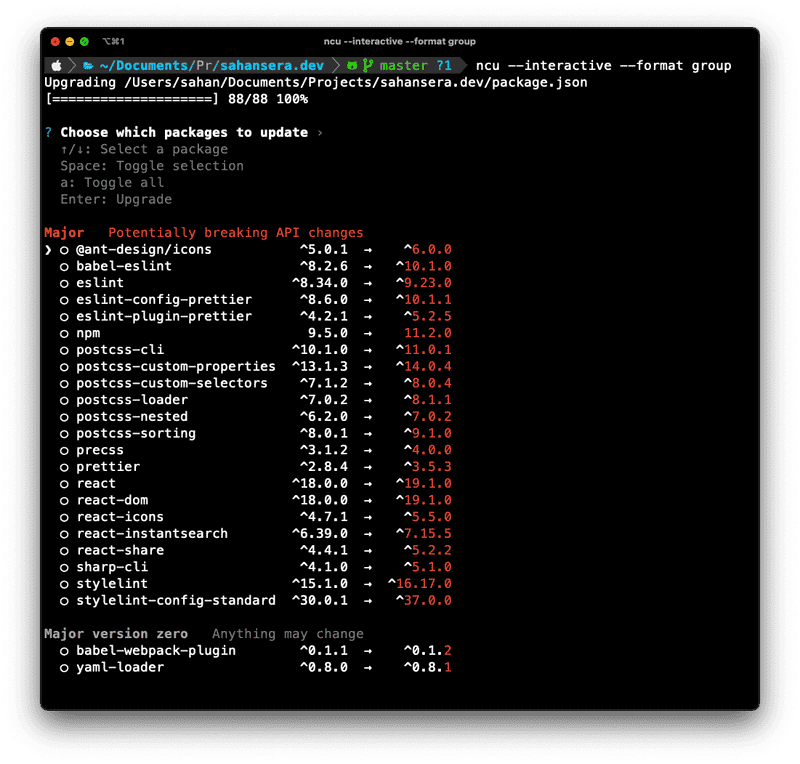
One of the first tasks was to ensure all my plugins were updated to their latest non-breaking minor versions. I used npm-check-updates to help with this.
ncu --interactive --format group
💡 Tip: Always stay on a separate branch, use commits for each change you make, while doing updates.
There were bunch of warnings, but nothing major. Next, I upgraded React and ReactDOM to v18. This was a bit tricky because I had to ensure that all my dependencies were compatible with React 18. I also had to update my Babel configuration to support the new JSX transform.
npm install react@^18.0.0 react-dom@^18.0.0After that, I bumped up the Gatsby version to ^5.0.0 and ran npm install. This is where the fun really began 😅
Plugin Upgrades
Many of my plugins were still on versions designed for Gatsby V4. I had to update or replace:
-
gatsby-plugin-catch-links, gatsby-plugin-feed, gatsby-plugin-google-gtag, gatsby-plugin-layout, gatsby-plugin-manifest, gatsby-plugin-offline, gatsby-plugin-react-helmet, gatsby-plugin-sharp, and gatsby-transformer-sharp etc..
Each of these required an upgrade to versions like^5.14.0or^6.14.0to resolve the peer dependency conflicts with Gatsby V5. -
Image Handling:
I migrated from the deprecatedgatsby-imageto the moderngatsby-plugin-image. This required updating my GraphQL queries from usingfluidandfixedfragments to using thegatsbyImageDatafield. I updated imports, replaced<Img>with<GatsbyImage>, and usedgetImage()to extract image data.
Much of this is covered in the official migration guide.
Then I ran into the infamous TypeComposer error.
Cannot create as TypeComposer the following value:
  GraphQLScalarType({ name: "Date", description: "A date string, such as 2007-12-03, compliant with the
 ISO 8601 standard for representation of dates and times using the Gregorian calendar.",
specifiedByURL: undefined, serialize: [function String], parseValue: [function String], parseLiteral:
[function parseLiteral], extensions: {  }, astNode: undefined, extensionASTNodes: [] }).
💡 The tl;dr here is there were multiple versions of
graphqlbeing used by other dependencies. I had to ensure that all my dependencies were using the same version ofgraphql. I did this by adding aresolutionsfield in mypackage.json:
{
  "resolutions": {
    "graphql": "^16.6.0"
  }
}
Then I ran rm -rf node_modules package-lock.json && npm install again to ensure all dependencies were using the same version of graphql. TypeComposer error was gone, but I still had a few warnings.
Next, I transformed my old GraphQL queries to the new format using the Gatsby codemod.
npx gatsby-codemods@latest sort-and-aggr-graphql .This worked like a charm and fixed most of the query related issues. Everything else, I just asked ChatGPT to help me with. I had to tweak a few queries here and there, but nothing major.
Styling Challenges
I also relied heavily on styled-jsx for component-scoped CSS. However, Gatsby’s official plugin, gatsby-plugin-styled-jsx, only supports styled-jsx v3-and I needed styled-jsx v5 for React 18 compatibility. After some consideration, I decided to remove the plugin entirely and instead configured Babel to handle styled-jsx directly.
This is where ChatGPT had most of problems. It went through a diamond dependency resolution problem and got stuck in a loop. I had to manually intervene and guide it through the process.
Enabling Nested CSS with styled-jsx
Even after removing the old plugin, I ran into issues when my <style jsx> blocks used nested CSS rules. By default, styled-jsx doesn’t support nesting. I resolved this by integrating styled-jsx-plugin-postcss along with the PostCSS Nested plugin:
-
Installed the Packages:
npm install styled-jsx-plugin-postcss postcss-nested --save-dev -
Created a Configuration File:
I added astyled-jsx.config.jsat the project root:module.exports = { plugins: [require('postcss-nested')] }; -
Updated Babel Config:
In my.babelrc, I ensured the styled-jsx plugin was configured to use the PostCSS plugin:{ "presets": ["babel-preset-gatsby"], "plugins": [ ["styled-jsx/babel", { "plugins": ["styled-jsx-plugin-postcss"] }] ] }
This allowed my nested CSS in components like the header, footer, and blog items to compile correctly. I would say this the part where LLM helped me the most! 💪
PostCSS Configuration Adjustments
During the upgrade, I also encountered warnings about duplicate autoprefixer instances. My initial postcss.config.js was using postcss-cssnext, which is now deprecated. After some experiments and research, I updated the config to use postcss-preset-env-a modern alternative that handles vendor prefixes efficiently.
Lessons Learned
-
Upgrade in Small Steps:
Tackling dependency conflicts one by one and verifying functionality helps isolate problems. -
Read Plugin Changelogs:
Understanding what’s changed in plugin APIs (like the migration fromfluid/fixedtogatsbyImageData) is crucial. -
Be Ready to Reconfigure:
Sometimes it’s necessary to remove old plugins (likegatsby-plugin-styled-jsx) and configure Babel or PostCSS directly to maintain compatibility with the latest React and Gatsby versions. -
Test Thoroughly:
Both in development mode and via production builds (gatsby buildandgatsby serve), to ensure SSR and dynamic behaviors work as expected.
Final Thoughts
Upgrading to Gatsby V5 has not only improved performance and introduced new features, but it also forced me to re-examine and modernize the entire toolchain-from image handling and styling to PostCSS configurations.
If you’re planning a similar upgrade, take your time, tackle one dependency at a time, and don’t hesitate to experiment with configurations until everything clicks.
Prepare to do some A/B testing by having a develop branch and a production branch. This way, you can compare the performance and functionality of your old setup with the new one.
Happy coding, and enjoy your faster, modernized Gatsby blog! 💜
References
Feel free to leave a comment if you have any questions or if you’d like to share your upgrade experiences!