Streaming APIs with FastAPI and Next.js - Part 1
Streaming data in the browser is one of those things that feels magical the first time you see it: data appears live - no need to wait for the full response to load. In this two-part series, we’ll walk through building a small full-stack app that uses FastAPI to stream data and a Next.js frontend to consume and render it in real-time.
💡 Code Repository: All the code for this post is available on GitHub. Feel free to explore, clone, and experiment with it!
There are many ways to stream data in the browser, from WebSockets to Server-Sent Events (SSE). But in this post, we’ll focus on a lesser-known method: chunked transfer encoding. This technique allows the server to send data in small, manageable chunks, which the browser can process as they arrive.
If you are interested in learning about Websockets, check out my post on Understanding WebSockets with ASP.NET. It’s targeted at .NET developers, but the concepts are similar. Again, the focus here is on streaming data in the browser and WebSockets is a different protocol altogether.
This post focuses on the frontend bit. In Part 2, we’ll dive into building the FastAPI backend.
🔧 The Setup
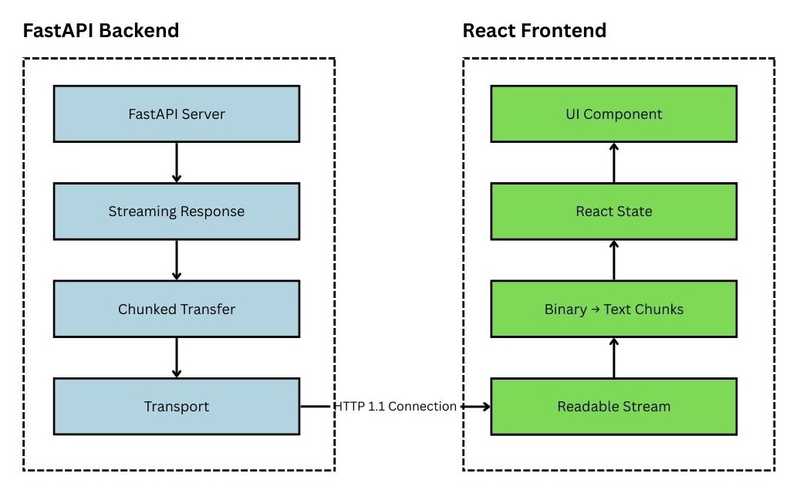
Let’s say you have a streaming API running locally at:
http://localhost:8000/streamThis endpoint sends back a stream of text data - think server logs, chat messages, or real-time updates. The goal is to connect to this endpoint from a React component and display data as it arrives.
Here’s a simplified version of the key parts of our React component (index.tsx):
// Key imports
import { useEffect, useState, useCallback } from "react";

export default function IndexPage() {
  const [dataChunks, setDataChunks] = useState<{ timestamp: string; log: string }[]>([]);
  const [isLoading, setIsLoading] = useState(true);
  const [error, setError] = useState<string | null>(null);

  const fetchStream = useCallback(async () => {
    // Reset state
    setIsLoading(true);
    setError(null);
    setDataChunks([]);

    try {
      // 1. Connect to the stream
      const response = await fetch("http://localhost:8000/stream");

      if (!response.ok || !response.body) {
        throw new Error(`Stream connection failed`);
      }

      // 2. Get a reader from the stream
      const reader = response.body.getReader();
      const decoder = new TextDecoder("utf-8");

      // 3. Read chunks until done
      while (true) {
        const { value, done } = await reader.read();

        if (done) break;

        // 4. Decode and update UI with each chunk
        const chunk = decoder.decode(value);
        setDataChunks((prev) => [
          ...prev,
          { timestamp: new Date().toLocaleTimeString(), log: chunk }
        ]);
      }

      setIsLoading(false);

    } catch (error) {
      setError(error instanceof Error ? error.message : String(error));
      setIsLoading(false);
    }
  }, []);

  // Connect to stream on component mount
  useEffect(() => {
    fetchStream();
  }, [fetchStream]);

  // Rendering components (simplified)
  return (
    <div>
      <h1>Server Log Viewer</h1>
      {/* Error handling and rendering of streamed data */}
      {/* See full code on GitHub */}
    </div>
  );
}
🧠 What’s Really Happening?
Let’s break this down and understand the key concepts behind streaming in the browser:
1. Fetching the Stream
const response = await fetch("http://localhost:8000/stream");Unlike regular fetch() calls that wait for the entire response before handing it over, this gives you access to the ReadableStream - letting you process data chunk-by-chunk.
2. Getting a Reader
const reader = response.body.getReader();This gives us a ReadableStreamDefaultReader, which lets us manually pull chunks of data from the response. This is part of the Streams API, now supported in all major browsers.
3. Reading Chunks
const { value, done } = await reader.read();value: aUint8Arrayrepresenting a chunk of binary data.done:truewhen the stream is finished.
We loop until done becomes true.
4. Decoding the Text
const decoder = new TextDecoder("utf-8");
const chunk = decoder.decode(value, { stream: true });
Streaming responses may split characters across chunks, especially for multi-byte encodings like UTF-8. TextDecoder handles this for us, making sure our text is correctly reconstructed.
5. Updating the UI
setDataChunks((prev) => [...prev, chunk]);We append each new chunk to our state array. React re-renders the component with every update, giving us that real-time feel.
6. One-Time Effect
useEffect(() => { ... }, []);The fetch logic runs once when the component mounts. Perfect for one-time side effects like opening a connection.
✅ Recap
With just a few lines of code, we’ve created a streaming experience in the browser using modern Web APIs. The key things were:
fetch()with a streaming responseReadableStream+TextDecoder- Updating React state to progressively display data
In Part 2, we’ll build the FastAPI backend to power this stream - including how to set up a streaming route and control flush timing for chunked responses.
💡 Gotchas to Watch Out For
- CORS: Make sure your FastAPI server has CORS enabled if frontend and backend are on different ports/domains.
- Buffering: Some servers (or even browsers like Safari) buffer streaming responses - so test in Chrome/Edge for best results.
- Cleanup: If you’re adding WebSocket or long-running fetches, remember to cancel or clean them up in
useEffectcleanup.