Distributed Caching in ASP.NET Core with Redis
About a year ago, I wrote a blog post on simple In-Memory Caching in ASP.NET Core with IMemoryCache. This article mainly introduced the concept of caching and how we can store stuff in the server’s memory for simple tasks. Today’s objective is to leverage the IDistributedCache to do some distributed caching so that we can horizontally scale out our web app.
💡 UPDATE on Aug 2022: I have recently migrated this project to .NET 6 also with its minimal hosting model and also added a docker-compose.yaml file for better developer experience 🎉. You can still access the .NET Core 5 (works with .NET Core 3.1+ too) version from this branch.
For this specific tutorial, I will be using Redis as my cache provider. Redis is a battle-tested, fast memory cache that can store many types of objects. Redis is being used by giants such as Twitter, Github, Instagram, Stackoverflow, Medium, Airbnb etc.
💡 You can find the accompanying code for this blog post from here.
Here’s a snapshot of what we are going to be building.
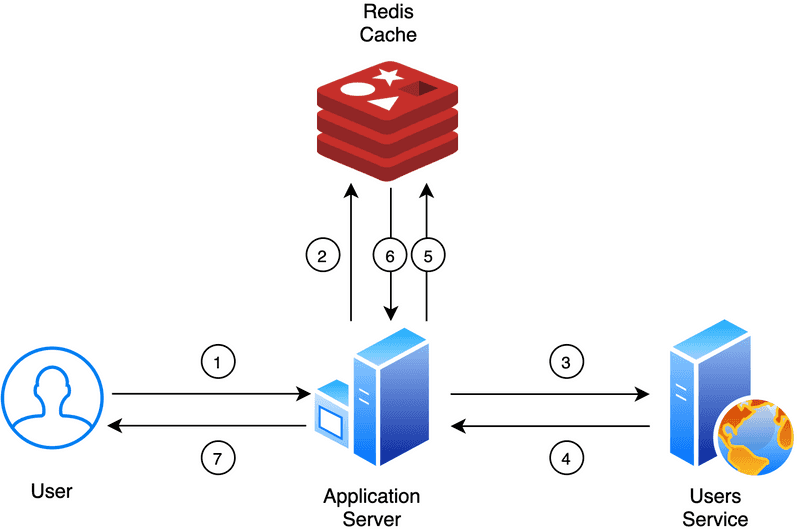
- User requests a
userobject. - App server checks if we already have a user in the cache and return the object if present.
- App server makes a HTTP call to retrieve the list of users.
- Users service returns the users list to the app server.
- App server sends the users list to the distributed (Redis) cache.
- App server gets the cached version until it expires (TTL).
- User gets the cached user object.
The main reason why we call this a distributed cache is that it lives outside of our application server (as opposed to traditional in-memory caching) and we have the flexibility of scaling it horizontally (when operating in the cloud), if need be. Head over here to have a look at how this could be useful in enterprise applications.
The IDistributedCache interface provides us with a bunch of methods to manipulate your cache. And the actual implementation is specific to the technology we want to use. Here’s a summary of different ways you can do this.
| Technology | NuGet package | Notes |
|---|---|---|
| Distributed Memory Cache | - | This is only recommended for dev and testing purposes. This is not an actual distributed cache. |
| Distributed SQL Server Cache | Microsoft.Extensions.Caching.SqlServer | Use SQL Server instance as a cache (locally or in cloud with Azure SQL Server). |
| Distributed Redis Cache | Microsoft.Extensions.Caching.StackExchangeRedis | Use Redis as a backing store (locally or in cloud with Azure Redis Cache)client package is Developed by peeps at StackExchange. |
| Distributed NCache Cache | NCache.Microsoft.Extensions.Caching.OpenSource | Wrapper around the NCache Distributed Cache |
Scaffolding a sample app
We will create a Web MVC app in ASP.NET Core 6.
dotnet new mvc -n DistributedCache
dotnet new sln
dotnet sln add DistributedCache
Let’s go ahead and add the Redis client package from NuGet.
dotnet add package Microsoft.Extensions.Caching.StackExchangeRedis --version 6.0.0Creating a Redis docker container
For this step, I assume that you have already installed Docker on your machine. It’s handy to have this so that you can spin up your own Redis container whenever you want for development purposes.
💡 For this section you can run
docker-compose.yamlat the root of the project to spin up a local Redis container.
docker run --name redis-cache -p 5002:6379 -d redisWe are telling docker to use the official redis image and spin up a container with the name redis-cache and bind port 6379 of the container to the port 5002 of your host machine. Why I chose port 5002 is that it might be open as it’s a less obvious port number.
If you haven’t got the Redis image locally, it will fetch that from the DockerHub and spin up a new container under the name redis-cache. Next let’s verify that our docker instance is up and running. You could do so with,
docker ps -aor alternatively with docker ps -a | grep redis-cache to filter our the output, if you have a bunch of containers running in the background like I do 😅

Now that we have the Redis container up and running let’s configure our web app to use it.
Application Configuration
- For .NET Core 3.1 - 5 with generic host model:
- For .NET 6+ with minimal hosting model:
Since we have already added the required NuGet package, we only need to register its service in our app’s DI container and tell it where to find our Redis instance.
// Register the RedisCache service
services.AddStackExchangeRedisCache(options =>
{
    options.Configuration = Configuration.GetSection("Redis")["ConnectionString"];
});
When we call AddStackExchangeRedisCache on the services object, it registers a singleton of RedisCache class against the IDistributedCache interface under the covers. This is what it looks like in the source:
// ...
services.Add(ServiceDescriptor.Singleton<IDistributedCache, RedisCache>());
// ..Since we have the Docker instance up and running at port 5002, we can mention that for development settings.
"Redis": {
  "ConnectionString": "localhost:5002"
}
I have brought across the service from my previous tutorial and added them to this project. You can find them under the Services folder. In fact, I have made the code to look more bit simpler as well.
Implementation
The functionality is pretty simple, and here’s what we going to do:
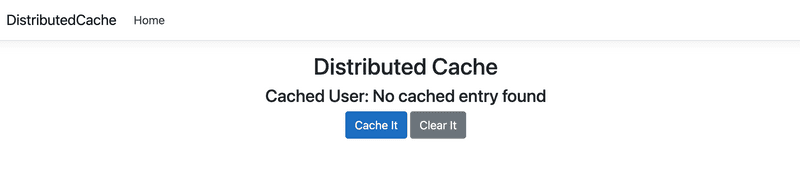
- Get the cached user (if any) and display its email address
- A button to invoke a HTTP call and cache a list of users
- A button to clear the cache
The UI would look something like the following.
Let’s look at the main entry point of the actions, the HomeController class.
public async Task<IActionResult> Index()
{
    var users = (await _cacheService.GetCachedUser())?.FirstOrDefault();
    return View(users);
}

public async Task<IActionResult> CacheUserAsync()
{
    var users = await _usersService.GetUsersAsync();
    var cacheEntry = users.First();
    return View(nameof(Index), cacheEntry);
}

public IActionResult CacheRemoveAsync()
{
    _cacheService.ClearCache();
    return RedirectToAction(nameof(Index));
}
The code here is pretty self-explanatory, and we implement the 3 features we discussed in the Index, CacheUserAsync and CacheRemoveAsync actions.
💡 Tip: You would ideally want to decorate the UsersService class with CacheService by using a DI container such as Scrutor. You don’t want to write the plumbing code we have written here to emulate a similar thing as the default DI container doesn’t support the behaviour. Refer to Andrew Lock’s excellent article on this topic.
I’m going to skip all the other plumbing code and show you how we Get and Set values with the Redis cache. The real magic happens in the ICacheProvider class.
The code itself it pretty self-explanatory. In the GetFromCache method, we call the GetStringAsync with a given key (_Users in this case). It’s worth noting that we need to deserialise it to the type we want before returning it to the caller. Similarly, we serialise our users list and save it as a string in the Redis cache under the _Users key.
public class CacheProvider : ICacheProvider
{
    private readonly IDistributedCache _cache;

    public CacheProvider(IDistributedCache cache)
    {
        _cache = cache;
    }

    public async Task<T> GetFromCache<T>(string key) where T : class
    {
        var cachedResponse = await _cache.GetStringAsync(key);
        return cachedResponse == null ? null : JsonSerializer.Deserialize<T>(cachedResponse);
    }

    public async Task SetCache<T>(string key, T value, DistributedCacheEntryOptions options) where T : class
    {
        var response = JsonSerializer.Serialize(value);
        await _cache.SetStringAsync(key, response , options);
    }

    public async Task ClearCache(string key)
    {
        await _cache.RemoveAsync(key);
    }
}
So what gets saved under the covers?
We can connect to the container and open up the redis-cli to see what’s inside. To do that, you could run the following command.
docker exec -it redis-cache redis-cliOnce you are in, you could issue a hgetall _Users command to inspect what’s inside the hash that got saved in our request.
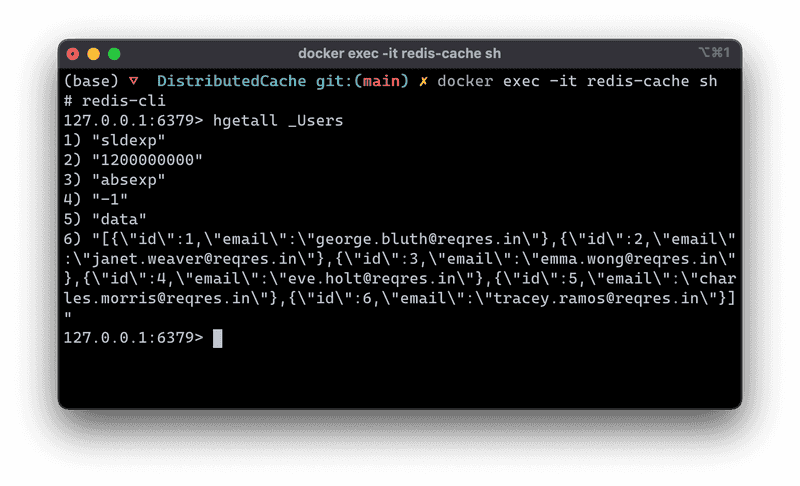
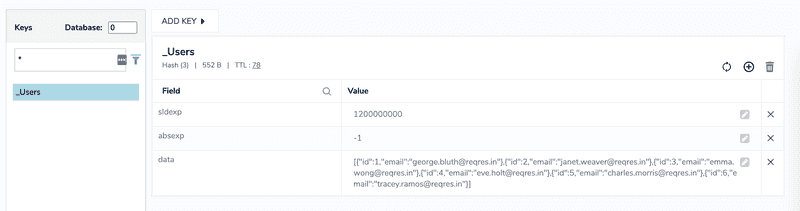
If you like to use a GUI, here’s a nice representation of what our web app saved under the hood. I used RedisInsight tool for this.
Demo
Here’s a working demo when you run the code from my repo:
As you can see, it will only fetch the users list only the first time we click the “Cache It” button. Every subsequent requests will fetch the users list from the Redis cache and serve to our app. The cache expiry can be configured by setting a sliding window or an absolute expiry by passing in configuration. In this demo I have set a sliding expiry for 2 minutes.
Conclusion
In this article, we converted our previous In-Memory example to use the IDistributedCache interface provided by ASP.NET Core and used Redis as a backing store. This approach can be utilised to leverage cloud service such as Azure Redis Cache for use-cases such as response caching, session storage etc.
Hope you enjoyed this article and feel free to share your thoughts and feedback. Until next time 👋